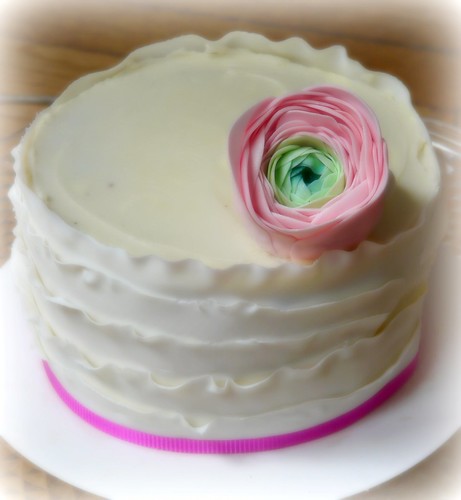
This was a very last minute (like I made everything including the gumpaste ranunculus in under 6 hours) cake for a baptism. It's rare that I would scramble like this but I had a bit of a sob story from the parents whose daughter was being baptized concerning the flaky baker they had originally hired to make this. There's been a recent spate of ruffle cakes circling the net (probably thanks in part to the very talented Maggie Austen) and I thought it would make a quick and simple design for this chocolate layer cake. Congratulations to Sophie and family on this special day!

28 August 2011
20 August 2011
Guest Post - Star Bakery

The final guest post in this summer series is from Liana from Star Bakery in the UK. I have followed Liana on flickr for some time and she is by far one of my favorite cupcake decorators on this side of the pond. On really, really, REALLY good days, my cupcake decorating comes out almost as perfect as hers. If only Liana could guest decorate in my kitchen some day, I could learn a thing or two! Take it away, Liana....
My name is Liana and I am a sugar addict. There, said it. I suppose this confessional should lead to some sort of relief on my part but it doesn’t. Why? Because I’ve known this and have been confessing this very truth for a very long time...
I’m the owner of Star Bakery in Nottingham, England and as a result am surrounded by the gooiest, sugar loaded, candy coloured treats on a daily basis. I started my bakery back in 2009 and after a fabulous career in Marketing and Communications, and being mum to two fab boys, I can honestly say I think I’ve found my niche in life.
This job is definitely the toughest job I’ve ever done and if you don’t fancy icing sugar laden houses and 3am finishes then please keep moving BUT anyone that bakes for a hobby will know the joys of baking from scratch and getting to indulge in the fruits of your labour.

Being constantly surrounded by sugary temptation does nothing to curb my sweet tooth and so I thought I’d share with you the one baked treat that satisfies my sugar craving and leaves me with a caramel induced contentment that lasts for days.
This recipe is often referred to as Millionaire’s Shortbread of Caramel shortbread and is based on a recipe from Nigella Lawson I came across on the internet – with tweaks!
Shortbread
175g unsalted butter
225g plain flour
75g caster sugar
Vanilla extract
Pinch of salt
Caramel topping
200g unsalted butter
397g/1 can sweetened condensed milk
Chocolate topping
250g milk chocolate
1tbsp butter/golden syrup
8x8” tin lined with greaseproof paper
Preheat the oven to 170 C/gas mark 3/325 F
Put the flour, sugar, vanilla and salt into a bowl and rub in 175g of cold butter, clumping the dough together to make a ball. Press this shortbread mixture into the tin and smooth it down with the back of a spoon. Prick the surface with a fork and cook for five minutes, then lower the oven to 150C/gas mark 2/about 320F, and cook for a further 30-40 minutes until slightly golden brown. Remove from oven and let it cool in the tin completely before adding the caramel topping.

Melt the remaining 200g of butter in a saucepan then add condensed milk. Bring to the boil, stirring all the time, and then reduce heat and simmer for 5-6mins until the mixture has turned a golden brown or thickened slightly. Take off heat and pour over the shortbread base and leave to cool.

Melt chocolate in your preferred way i.e. microwave or in a bowl over a pan of simmering water and add butter of syrup to add shine to your chocolate. Once melted pour over cooled caramel topping and allow to set at room temperate so the chocolate doesn’t go dull. This recipe makes about 16 generous pieces but this varies depending on how you cut your shortbread!
I hope you enjoy this recipe, it might seem like a lot of hard work but I take it in stages and making the caramel is very soothing so ideal for that post-dinnertime wind down before the ‘joys’ of the children’s bedtime kick in...
18 August 2011
Easy Peasy Lemon Squeezy!
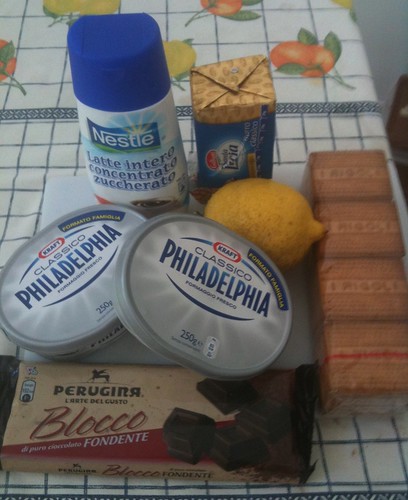
Even though I'm officially on vacation, I have a hard time shutting off when it comes to making sweet after-dinner treats! I have limited baking facilities so have had to adapt someof my favorite recipes for simpler execution. This is a no-bake cheesecake that is super fast and easy to prepare. Here's what you need:
For the Crust:
1 sleeve of tea biscuits, graham crackers, chocolate cookies or whatever you want to make your crust with (about 20 cookies)
2 ounces unsalted butter, melted
2 tbsps sugar
1) Place cookies inside a plastic bag. Using a rolling pin or if you're like me and don't have access to one, the bottom of a skillet, bash the cookies until you have a very fine crumb.
2) Pour into bowl, add butter and sugar and stir to mix.
3) Using the back of a spoon, flatten crumb mixture into the bottom and up the sides of a shallow round baking pan or springform mold (8 inch).
4) Store crust in freezer about 10 minutes while you make the filling.
For the Filling:
3 packages Philadelphia cream cheese
200 ml whipping cream
1 cup sugar
juice from 1 lemon
4 large squares from a chocolate tablet (I used Perugina dark)
1) Whip cream until soft peaks form and set aside.
2) Using the back of a fork, mash cream cheese in a large bowl, add sugar and lemon juice and stir to combine.
3) Mix in whipped cream until you have a homogenous, creamy filling.
4) Spoon into crust and smooth with a spoon or fork for a flat surface. Reserve in fridge while you melt the chocolate.
5) Melt chocolate squares in microwave for about 60 seconds or until smooth.
6) Drip chocolate in dollops over the surface of the cheesecake. Drag the tip of a sharp knife over surface of the cheesecake in figure 8's for a decorative pattern.
7) Leave cheesecake in fridge at least 10 hours or overnight to set. Serve and enjoy!
If you have any simple, no-bake recipes you'd like to share,please do so in the comments section!
14 August 2011
Guest Post - Fields of Cake & Other Good Stuff

This is the 3rd installment of guest posts where I've asked some of my favorite blogger/bakers to share a recipe. Have you been enjoying them? And better yet, have you tried out any of the recipes? Today's post comes from Carrie of Fields of Cake & Other Good Stuff - we used to compete in the Iron Cupcake Challenges and I was always wowed by her amazing flavor combinations and drool-worthy food photography. I'm so happy Carrie agreed to share one of her recipes here and all I can say is get ready to be swept off your feet too! Here goes.....
This has been a wacky summer. Some days have been rainy and cold, some super hot and humid. There hasn’t been any real, long stretch of one or the other, just a yo-yo type thing. I have been crazy busy with wedding cakes and cupcakes, taking care of my boys, going to conferences and workshops, entertaining guests….but one thing I would NEVER miss, is helping out my friend Cat and getting to do a guest blog for her! I was SO excited when she asked me. What an honor!
She asked for something light and summery and I dreamt of light lemon cupcakes, fluffy strawberry cupcakes, delicious vanilla cupcakes, airy cotton candy cupcakes, but in the long run I was crazy busy and decided to share a favorite of mine from my blog from a while back but I revised just a bit to make it a little more fun.
Thanks Cat for your patience and love. You are awesome!!
So without further ado….

Almond Strawberry Shortcake Cupcakes!!!
Macerated Strawberries
• 2 lbs. fresh strawberries washed and diced
• 3 Tbsp. Chambord
• 3 Tbsp. Amaretto
• 1/4 cup sugar
• 1/2 tsp. fresh ground black pepper
In bowl combine all ingredients and refrigerate for 1-3 hours.
* Puree half of the mixture some for the buttercream and some to mix with the rest of the strawberry mixture.

Almond Vanilla Cupcakes (adapted from Warren Brown's Cake Love)
• 1 cup all purpose flour
• 1/4 cup almond flour
• 2 ounces potato starch
• 1 1/2 tsp. baking powder (1 tsp at high altitude)
• 1 tsp. salt
• 1 cup half and half (1 cup + 2 tbsp. at high altitude)
• 2 Tbsp. Amaretto
• 1 Tbsp. Vanilla extract
• 1/2 tsp. almond extract
• 1 1/2 sticks (6 ounces) unsalted butter (room temp)
• 12 ounces sugar
• 4 large eggs (5 at high altitude)
Sift the flours, potato starch, baking powder and salt into a bowl and set aside.
Combine half and half, Amaretto, vanilla extract and almond extract in a large measuring cup and set aside.
In bowl of standing mixer fitted with a paddle attachment, cream together the butter and sugar on the lowest speed for 5-7 minutes.
With the mixer still on the lowest speed, add the eggs one at a time, fully incorporating after each addition. Stop the mixer and scrape down the sides and bottom of the bowl.
Add the dry and wet ingredients alternating in 3-5 additions. This should take no more than 60 seconds total...you don't want to mix too much.
Stop the mixer and scrape the bowl remembering to get the bottom of the bowl. Mix on medium speed for 20 full seconds to develop the cakes structure.
Portion evenly into 24 cupcake papers. Bake for 22-25 minutes at 350 degrees. I find I need to bake mine a whole 25 minutes or they shrink from the sides. They should be a nice dark golden brown on the top, don't worry these are moist cupcakes...amazing! It is now my "go to".
Fresh Strawberry Buttercream
• ¾ lb. unsalted butter (softened)
• 1/2-3 ounce package instant vanilla pudding mix
• 1/2 cup strawberry puree
• 1/2 cup cream
• 1/2 cup macerated strawberries
Beat butters and instant pudding mix in mixer until light and fluffy, about 8 minutes or so. Turn mixer to low and slowly add the puree and then the cream. Beat for another 3 or 4 minutes. Fold in the macerated strawberries ( I found I kinda had to beat them into the buttercream to get it all to come together once adding the strawberry chunks, but don't worry...it's worth it)

Vanilla Bean Buttercream
1 lb. unsalted butter (softened)
1/2 pkg. french vanilla instant pudding mix
1/2 cup heavy cream
1/2 cup (or more to suit your tastes) powdered sugar
In mixer set on medium speed, beat the butter and vanilla bean seeds until smooth and silky. Turn the speed to low and add the pudding mix, when it is all incorporated, slowly add the cream, a little at a time. When fully incorporated bring speed up to high and beat for 5-7 minutes. Turn speed back down to low and add powdered sugar by Tbsp., tasting along the way. When it is sweet to your taste, beat again at high speed for a good 5 minutes to really break down any graininess that you might get from the powdered sugar. Bring back down to low speed and beat for a while that way to get rid of air bubbles.
To assemble these delicious morsels...follow these instructions
• cut a cone in the top of each cupcake..I made mine fairly large to accommodate more strawberries..yum!
• put about a half teaspoon of buttercream into each cone then top with chunks of macerated strawberries and more juice, place the cone cap back on top.
• Pipe the vanilla buttercream around the outer edge of the cupcake and fill the hole in the center of the buttercream with the strawberry buttercream. Ta da!!!
12 August 2011
For Jennifer & Mikey Perillo - Peanut Butter Pie Friday

Ironically, it was because of my husband that I first discovered Jennifer Perillo's blog: In Jennie's Kitchen. For those of you who don't know me, I started a custom cupcake business about 3 years ago and it has been a crazy busy ride. I rarely bake recreationally anymore, or for my family as my husband often laments. About 8 months ago, I declared I would no longer work on Sundays -- so I would have at least one day off a week to spend some good quality family time. And I've picked up the practice of baking for them again -- usually chocolate chip cookies which is one of my husband's favorite treats. We have differing opinions on what makes a perfect chocolate chip cookie; I've made it a personal quest to find the best recipe and have tried about 3 dozen so far. Jennie's chocolate chip cookie recipe came up on one of my searches, and I bookmarked it along with about 12 others I have been meaning to come back and try. Hers calls for molasses, a hard to find ingredient in Paris and not something I keep in my pantry.
Over the course of the past few months, I've revisited Jennie's blog on many occassions. She has a direct and honest writing style I find endearing and the recipes I have tried from her blog have always garnered rave reviews. She once thanked her readers as being "a ray of sunshine" in her life and that is exactly how I have come to think of her. I've never met Jennie but sensed she was a kindred spirit and I enjoyed following along her comings and goings while she shared so many wonderful recipes and techniques.
Just like me, Jennie's a mom to two young kids aged 3 and 8. Like me, she is constantly striving to balance her personal and professional lives. Like me, she is passionate about food and often reminisces about touchpoints in her life and people who have influenced her as she cooks on her blog. She lives in New York, my hometown. And like me, she had settled down with a hard-working man who took his responsibilities to heart -- often working long hours and bringing the stress and the demands of the job home with him. The Mr. as she commonly referred to him. Mikey as I have come to know him this past week. A post for chocolate snaps, where she recounts one of her first dates with Mikey, her partner for life who loved and supported her in everything she did, brought a tear to my eye when I originally read it this past winter. The sentiments expressed there are so much more bittersweet given the events of this past week.

Like many in the food community, I learned the devestating news via Twitter. Jennie's Mikey, the love and light of her life, had tragically and unexpectedly passed away. There are things that happen in life that are inexplicable and just so unfair. This is one of them. A man loved by his family and so many others suddenly cut short in the prime of his life. Like me, I am sure Jennie expected her husband to be there at her side for decades to come -- to watch their kids head out into the world and forge their own way, to experience all the ups and downs that life threw at them, to love and laugh and to grow old together. My heart is overflowing with sorrow for Jennie and her kids. For all the sadness they are dealing with right now and for all the years to come without Mikey.
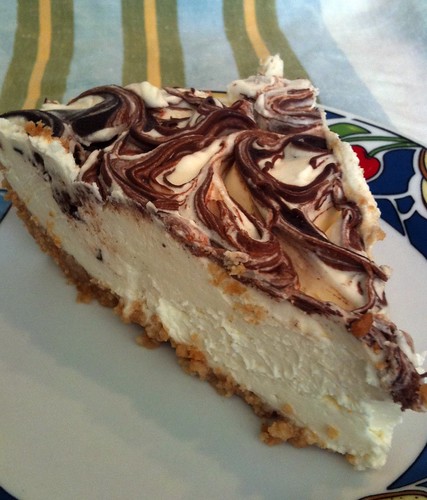
In her latest blog post, Jennie shares Mikey's favorite recipe -- Creamy Peanut Butter Pie, and invites the world to celebrate his life by baking one and eating it with someone you love. For me, making this pie was a small labor of love. We are currently on vacation (something Jennie and Mikey were to do in just a few days!) All I had to make this recipe with was a small cake tin and a mixing bowl. No scales, no measuring cups or spoons, no real oven - that's all back in Paris with my nephew who is housesitting for us! I actually used an empty Peroni beer bottle in lieu of a rolling pin to smash the biscuits to pieces for the crust. And I consider it a minor triumph that I was able to find the ingredients I needed to make this in a foreign country where I don't speak the language. I did however modify the recipe; there was no peanut butter to be found in this small coastal village, and more importantly, my husband actually hates peanut butter (he's French after all!). Given the circumstances, I loved that Jennie's pie is no-bake and so I stuck with something just as easy to prepare by swapping out the peanut butter cream filling for cheesecake filling. Cheesecake is one of my husband's favorites. I didn't think Jennie or Mikey would mind.
I'll be eating this pie with my family tonight -- the family I don't tell often enough how much I love them or how important they are to me. I will savor each bite as I express how grateful I am for the love and life that I have, and I will think of Mikey and all that he has left behind. May his memory and light live on in Jennie, in their two beautiful daughters, in their friends and loved ones, and in his favorite dessert: Peanut Butter Pie. Here's Jennie's recipe so you can make and share one with the ones you love!
Creamy Peanut Butter Pie
Originally published by Jennifer Perillo at In Jennie's Kitchen
Serves 10 to 12
8 ounces chocolate cookies
4 tablespoons butter, melted
4 ounces finely chopped chocolate or semi-sweet chocolate chips
1/4 cup chopped peanuts
1 cup heavy cream
8 ounces cream cheese
1 cup creamy-style peanut butter
1 cup confectioner's sugar
1 – 14 ounce can sweetened condensed milk
1 teaspoon vanilla extract
1 teaspoon freshly squeezed lemon juice
Add the cookies to the bowl of a food processor and pulse into fine crumbs. Combine melted butter and cookie crumbs in a small bowl, and stir with a fork to mix well. Press mixture into the bottom and 1-inch up the sides of a 9-inch springform pan.
Melt the chocolate in a double boiler or in the microwave. Pour over bottom of cookie crust and spread to the edges using an off-set spatula. Sprinkle chopped peanuts over the melted chocolate. Place pan in the refrigerator while you prepare the filling.
Pour the heavy cream into a bowl and beat using a stand mixer or hand mixer until stiff peaks form. Transfer to a small bowl and store in refrigerator until ready to use. Place the cream cheese and peanut butter in a deep bowl. Beat on medium speed until light and fluffy. Reduce speed to low and gradually beat in the confectioner's sugar. Add the sweetened condensed milk, vanilla extract and lemon juice. Increase speed to medium and beat until all the ingredients are combined and filling is smooth.
Stir in 1/3 of the whipped cream into the filling mixture (helps lighten the batter, making it easier to fold in the remaining whipped cream). Fold in the remaining whipped cream. Pour the filling into the prepared springform pan. Drizzle the melted chocolate on top, if using, and refrigerate for three hours or overnight before serving.
06 August 2011
Guest Post - Liz's Cupcakes
The second in my summer series of guest posts comes from Liz, the owner of Liz's Cupcakes in Nafplio, Greece. Liz and her husband opened shop a little over 6 months ago and are already creating a cupcake craze in their town. Liz shares with us her "Greek inspiration ― Olive & Ouzo cupcakes"! Take it away, Liz......

When Cat asked me to do a guest post for Sugar Daze I thought it was a great opportunity to play around with a couple of ideas I'd been having for new cupcake flavours. I thought about Greek products that might go well in a cupcake and might go well together.

Some of the ingredients I had in mind were figs, olives, brandy and ouzo.

I've had this jar of sweet olive preserve for a while now and I've been thinking of a good way to get them into a cupcake. Here in Greece it's very common to make a sweet preserve of various fruits and vegetables even.

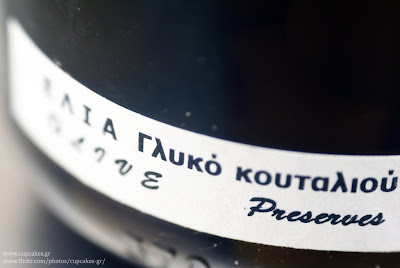
It's not jam, marmalade or jelly but fruit or veg that is sometimes blanched and then stored in a sugar syrup. Depending on the fruit it can be boiled in the syrup or separately. You can get all the popular fruits such as cherry and grape and also more unusual things, such as baby egg-plant, all in sweet preserve form. They are often served on a small saucer, just a spoonful and are considered a healthy treat. They are fat free but are full of sugar!
In the photo below we have sour cherry on the left and my olive preserve on the right:

The thing that I admire about the women who make 'spooned sweets' as they're often referred to here, is that it totally encompasses thriftiness. Not a thing goes to waste. The abundance of fruit and vegetables from the trees and gardens can be preserved in sweet form for months.
Sweet Olive preserve is not widely available in Greece, well not at the supermarkets anyway, you probably have to go to a shop that specialises in sweets and other Greek produce. I get mine from a wonderful local shop: Melokipos (Honey garden).
So anyway... I was thinking that olives and figs together would be a very unusual concept but in the end I realised that the cinnamon and clove that are in the preserved olive just wouldn't work together so well.

I'd already soaked some dried figs in brandy overnight so in the end I made a simple batch of plain cake adding the finely chopped olives to half of it and the finely chopped brandy soaked figs in the other half.

I often use the simple recipe of 100g flour, 100g sugar, 100g butter & 2 eggs recipe when I'm doing experimenting. I can tell afterwards if I need to change the recipe to get it more or less moist, it's a good starting point.
There was a delicious smell in the kitchen as they were baking! For the frosting I made a simple buttercream; for the olive cakes I added some ouzo and for the fig cupcakes I added some brandy.

Findings: The Olive & Ouzo cupcake was really good and I'm not even an olive fan! Alex thought it was a little dry and maybe it could have done with a slightly more moist cake. The ouzo in the frosting is very interesting. You can barely tell it's there and then right at the end you get the slight taste of aniseed.


The Brandy Fig cupcake was divine too. I'm partial to figs so I knew this one was going to be my favourite.

I can't wait to try something similar when the fresh figs are in season, towards the end of summer. I also think that some cocoa in this cupcake wouldn't go amiss. It won't be too painful to have to do some more experimenting!
Subscribe to:
Posts (Atom)